

Overview
Have you ever written some code and want to be able to share it with others? If so, then you’re in the right place! In this post, we will learn the basics of Git, including:
- Installing Git
- Git Repository Hosting Options
- Common Git Commands
- Hello Git Repository
Installing Git
Windows
Step one is to head over to the Git downloads page and select your operating system to download.
Execute the exe once it finishes downloading. I would keep all of the defaults on the installation screens, except on the “Adjusting the name of the initial branch in new repositories” screen, I would recommend selecting to override the default and specifying what it should be. This will ensure that your default branch name will be named consistently.

Click install on the final screen and Finish when the install is complete.
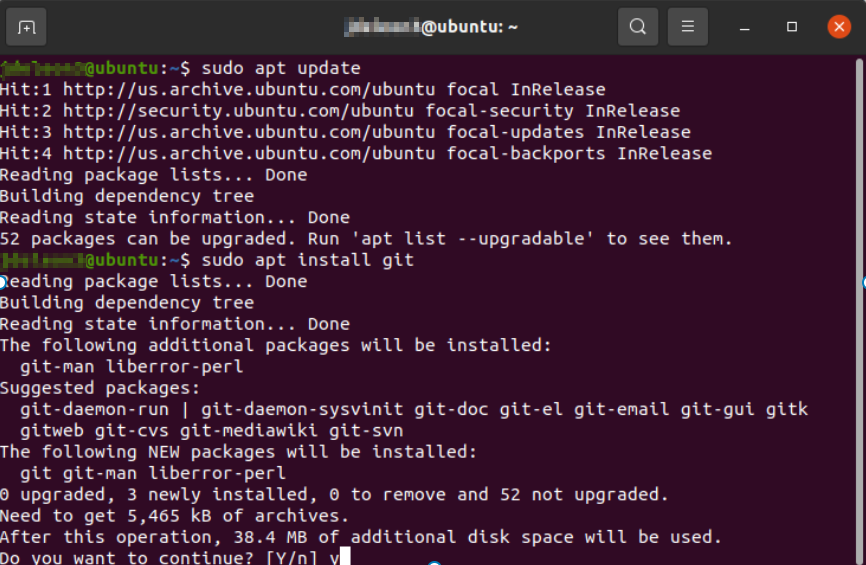
Linux Ubuntu
Installing on Linux Ubuntu, I used the following commands:
Enter “y” when prompted if you want to continue.
The final step to get Git ready to go locally is to configure your user information.
And with that, Git should now be installed and ready to go!
Git Repository Hosting Options
Now that you have Git installed locally, you need to find a place to host your Git Repositories. Two of the more well-known platforms are GitLab and GitHub. While GitHub is more well known, GitLab has some interesting DevOps features that make it worth looking into. I’ve provided a few highlights for each below:
- Repository Platform with automation actions to support CI pipelines
- 2,000 automation minutes/month in public repositories
- 500 GB storage per repository
- DevOps platform with repositories, build/deploy pipelines included
- 400 CI pipline minutes included in Free tier
- 10 GB Storage Limit per repository
Take your time and check out each of them, as they both have free options!
Common Git Commands
As you start working with your Git repositories, there are some Git commands that you will use quite often. I’ve included a list of the most common commands below:
| Command | Description |
|---|---|
| git config | Configure user information for all local repositories |
| git status | Shows the working tree’s status |
| git clone | Clones a repository into a new folder in the current directory |
| git switch | Switches the current branch in the repository |
| git checkout | Switches branches and updates files to match the branch you are checking out. Prepares branch to be worked in. |
| git add | Adds new and modified files to the changes that will be included in the next commit. |
| git push | Adds local commits to the repository |
| git fetch | Downloads from the remote repository |
See git’s documentation page for more details and commands as you want to do more advanced operations with Git.
Hello Git Repository
Now that you have Git installed and a place to host your repositories, let’s put some of those common commands to use and push a local commit to a repository.
First, log into your repository host of choice website and create a new blank repository/project.

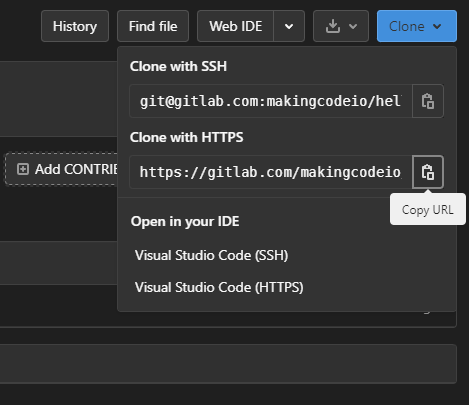
From there, go to the Code section and you will see a Clone button similar to the one below. Click on the copy icon for the HTTPS option.
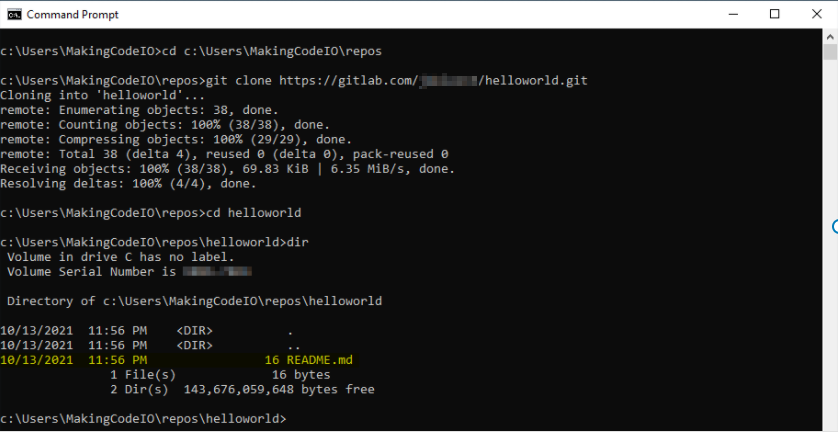
Next, you will need to clone the repository locally, using the git commands below:
As you can see, a helloworld folder was created, and the README.md file from the repository was copied down.
Next, let’s add a Hello World console app project in .NET 5 (You can visit my .NET 5 – How To Get Setup Today! post if you need help getting started in .NET 5). The commands below creates a new .NET5 console app and tests to make sure the project runs as expected.
After that, let’s navigate back to the repository root and add the helloworld app folder to our local repository tracking and commit the changes. Finally, we will do a git push to get the changes into our remote repository.
Looking back in your hosted repository, you will now see the helloworld folder that we created is now in your remote repository.

Summary
Now, you should have Git installed locally, a place to host your Git Repository, and your first experience creating a repository and pushing your local commits to it!
Feel free to leave a comment below and share this guide with your friends!